3. Queries
Queries are the main mechanism for extracting and managing information in LUCA. The other elements —such as graphs, trees, or other visual components— are built from these.
Their flexibility and parametric capabilities make them one of the key elements in the configuration.
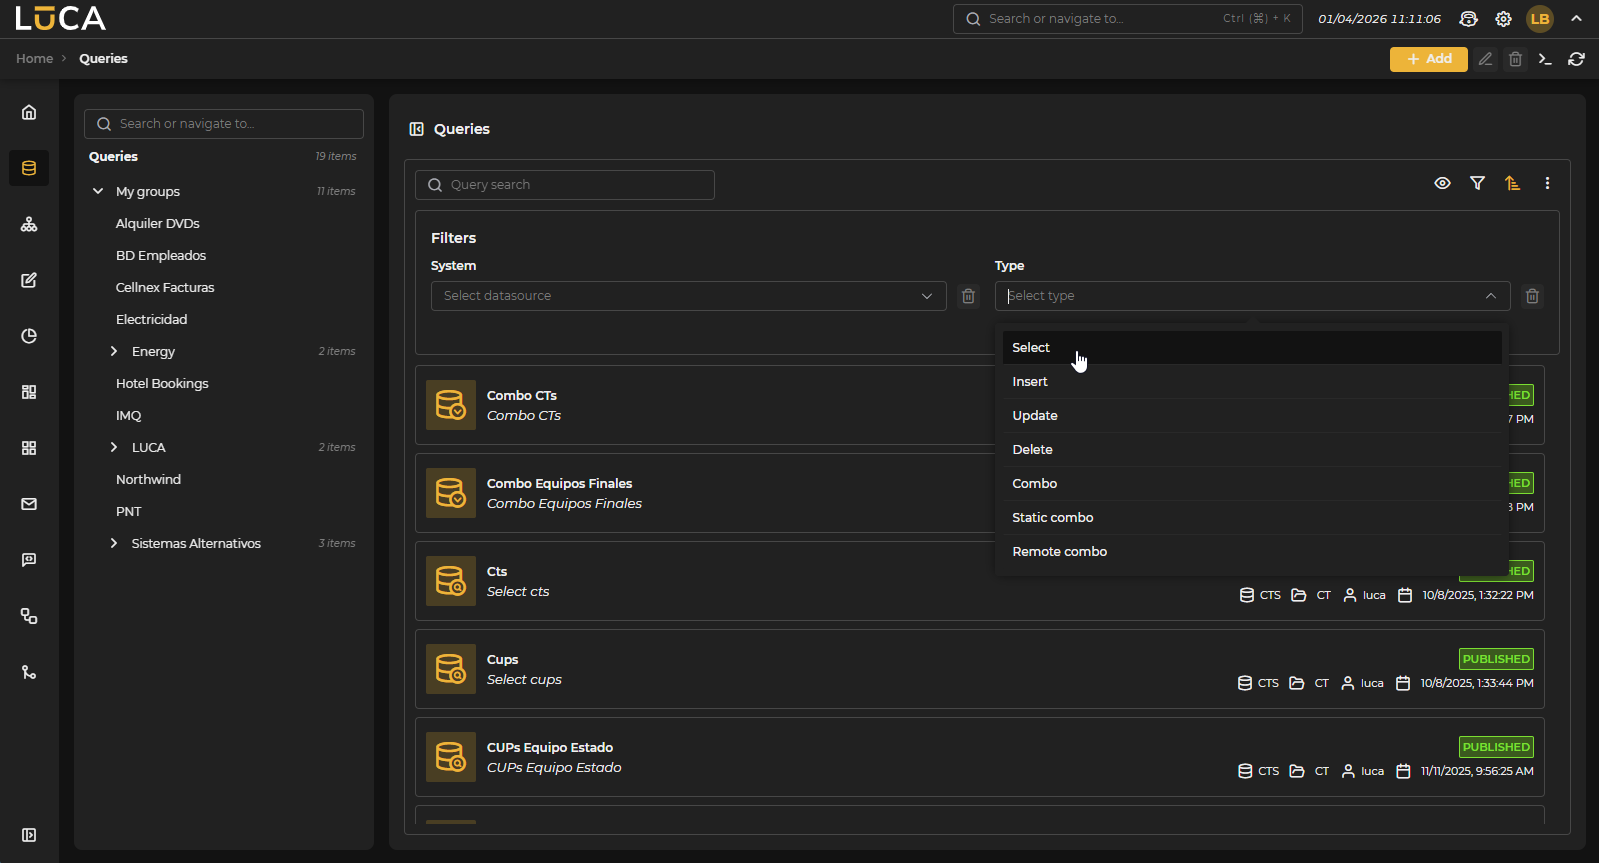 Figure 3.1: Query Management
For more information about the general management screen, see this section.
Query Creation and Editing
In the query creation view —where elements are collapsed by default, except for the editor— we find the following structure:
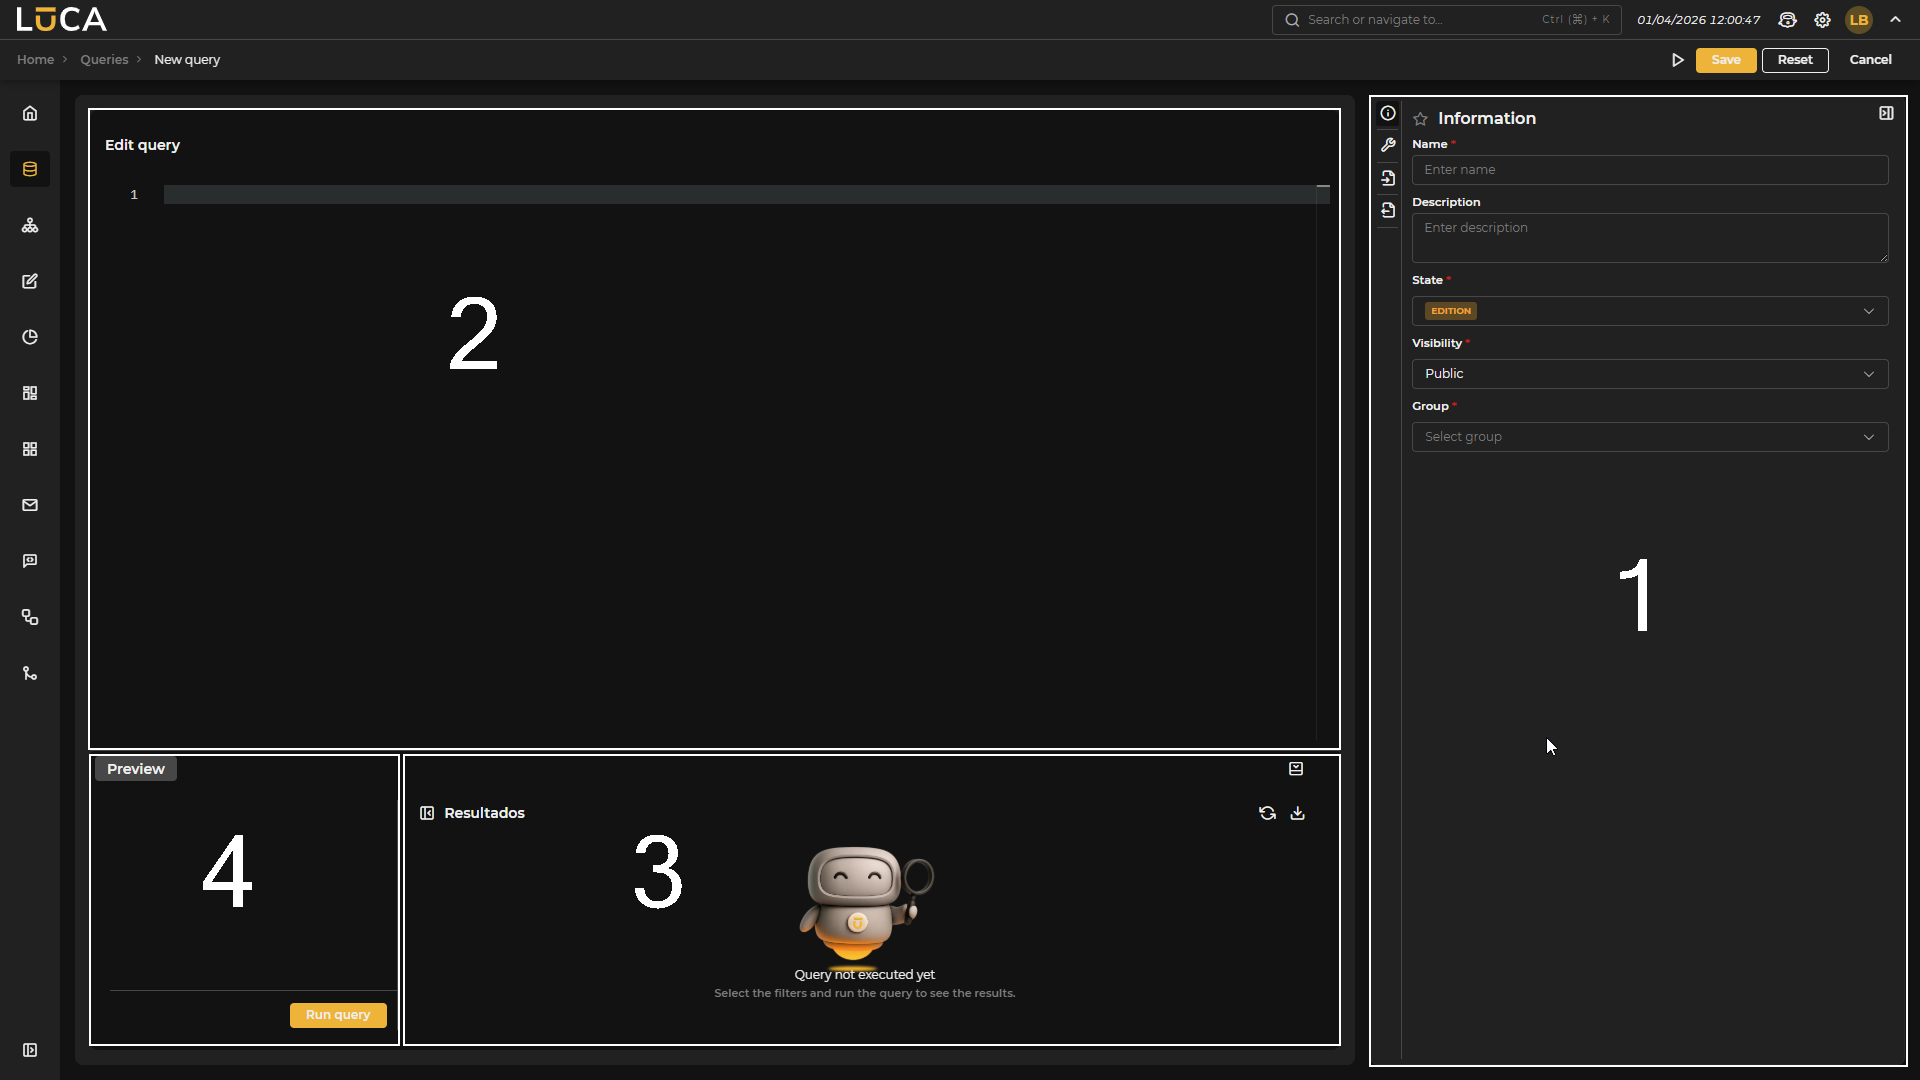 Figure 3.2: Query Creation
Configuration (1): This section has four menus where we can configure all the information and parameters of the query.
Editor (2): Text editor that offers syntax highlighting, facilitating the writing and reading of the SQL query.
Results (3): Allows execution of the query and review of its results before saving it.
Preview (4): Visible only when the datasource of the query is of Database type. It allows querying its schema, including all its tables and columns.
Regarding the configuration section, we find the following buttons:
- Execute: Saves and executes the query.
- Save: Saves the query information.
- Reset: Clears the data entered in the form.
- Cancel: Closes the editor and returns to the query management screen.
Information
The Information form is common across LUCA elements.
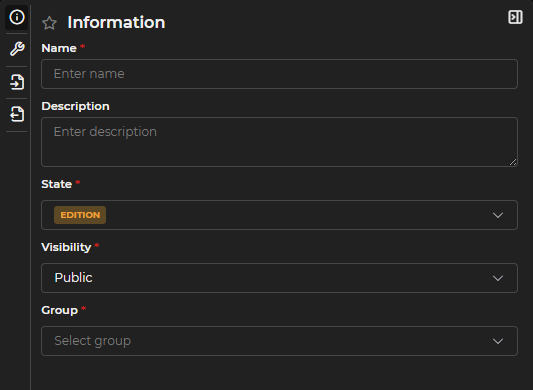
Figure 3.3: Information Form
In LUCA, elements have a name and a description that facilitate their identification and are always associated with a group, which allows controlled access management.
Moreover, they have a status:
- Published: The element can be executed, and any user —with the necessary permissions— can use it.
- In editing: Allows saving the element while it is being created or modified. Only the user editing it can make changes; other users will not be able to execute it until it is published.
And a visibility —to manage who can see the element—:
- Public: Users with access to the group to which the element belongs can interact with it, according to the assigned permissions.
- Private: Only the creator and users with administration permissions can see it.
- Restricted public: Only available in graphs. Users will not be able to use filters that have not been predefined.
Configuration
Specific query form where the following fields must be completed.
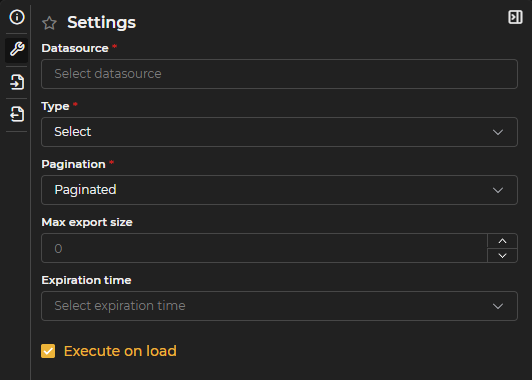
Figure 3.4: Query Configuration Form
Datasource: Information system where the query will be executed.
Query Type
- Select: Query for extracting information.
- Insert: Query to add one or more new records to a database table.
- Delete: Query to delete one or more records from a database table.
- Update: Query to update one or more records in a database table.
- Combo: Queries designed to provide a list of options, each consisting of an internal value and a descriptive detail, which can be used in combo input variables.
- Static combo: Variant where the list of options (value and detail) is fixed and manually defined, ideal for simple dropdowns like "Yes/No" or limited lists.
- Remote combo: Similar to the previous ones, but the query that retrieves the options is only executed when the user starts filtering by text. It is especially useful for combos with many values since the maximum number of results is limited by a parameter.
Pagination
- Paged: Default option. Results are shown on pages, facilitating the management of large data volumes and improving performance. It is the most recommended alternative for queries that can return many records.
- Paged without count: Similar to the previous one, but omits the additional query that calculates the total number of records. Useful when counting is costly and only navigation by page is needed.
- Unpaged: Retrieves results all at once. Advisable only for queries returning few data points, as it may negatively impact performance if the volume is high.
Maximum export size: Sets the maximum number of records to be exported to CSV or Excel. If a value is specified here, it takes precedence over the general limit defined in the system parameter.
Cache time: Allows temporarily storing the results of the query in memory, avoiding repeated execution while the configured time has not expired. Once that period has passed, when the query is executed again, the data will be updated and stored in cache anew.
Execute on load: If this option is enabled, the query will automatically execute upon opening, applying the filters of input variables that have predefined values. If any mandatory variable lacks a default value, the query will not execute or display results until that value is completed.
Specific Options for Insert, Update, and Delete
Queries of type Insert, Update, and Delete have additional configuration fields:
Maximum affected rows: Maximum number of records that can be modified in a single execution. Acts as a security measure to prevent unwanted massive modifications.
Bulk load: Allows loading data from a CSV file to perform bulk inserts or updates.
Skip first line: When activated, ignores the first line of the CSV file, useful when it contains the column names.
CSV separator: Character used to separate values in the CSV file (default is comma).
Confirmation type: Defines the behavior in case of error during execution:
- Rollback if fails: Reverts all changes if any error occurs.
- Confirm even if fails: Applies successful changes even if some records fail.
Input Variables
Input variables allow the user to filter the data returned by the query according to the criteria they define. For example, a date can be entered to obtain only the records after that date.
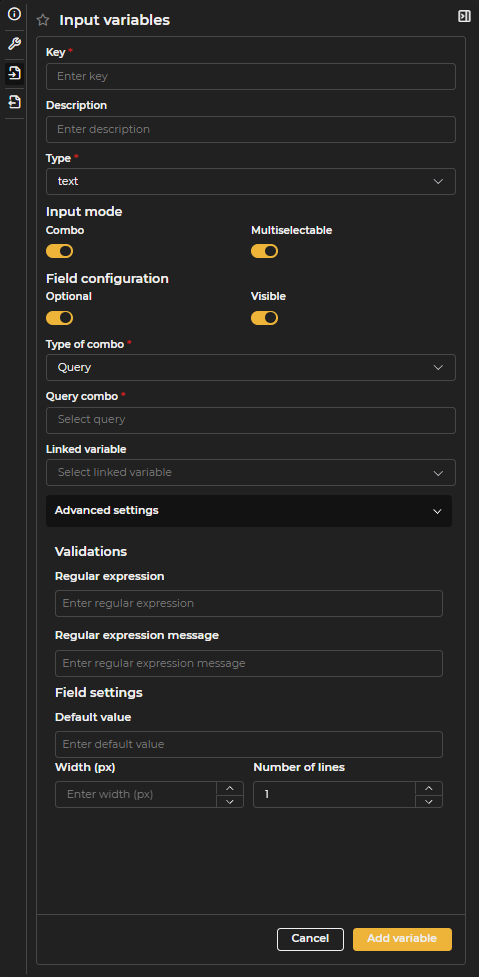
Figure 3.5: Input Variables Configuration Form
Key: Internal identifier that will be used in SQL. It must consist only of letters, numbers, or underscores, without spaces or special characters.
Description: Visible label for end users. If not specified, the Key will be displayed as the descriptive name.
Type
- Integer: Allows only integer numbers.
- Decimal: Allows entering decimal numbers.
- Text: Allows entering text strings.
- Boolean: Allows selecting between two values: true (when checked) or false (when unchecked).
- Date: Allows selecting or entering a date.
- Date range: Allows selecting a date range, either from predefined ranges or by creating a custom one (see custom value).
Format: When the input variable is numeric or a date type, its format can be customized. For numeric variables, indicate whether to show the thousands separator and whether to abbreviate values (K, M, etc.). For decimal variables, it allows defining the minimum and maximum number of decimals. For date-type variables, various formatting options are available.
Multi-selection: Allows selecting more than one value. When the Combo option is enabled, a dropdown is shown with a button to select or deselect all values at once. When Combo is disabled, the user types values one by one and adds them individually to the selector.
Optional: Indicates whether the input variable is optional or if a mandatory value is required to execute the query.
Visible: Determines if the input variable will be visible to the user. For instance, it can be useful to hide current user variables.
Advanced configuration: Allows defining additional options for each variable, such as validation using regular expressions, minimum and maximum values for numeric inputs, default values, and the width in pixels of the variable.
Once the configuration is completed, the option to add or confirm the variable must be selected to apply changes.
In Insert or Update queries, input variables form the necessary form to create or edit the corresponding record.
Changes made to input variables are not saved automatically. The query must be persisted to confirm the changes.
Output Variables
Output variables must be declared when they are used in a graph, in other LUCA elements, or when modifying the format of a column. For example, if the query returns a date, it is possible to define the display format or assign a different description than that defined in SQL.
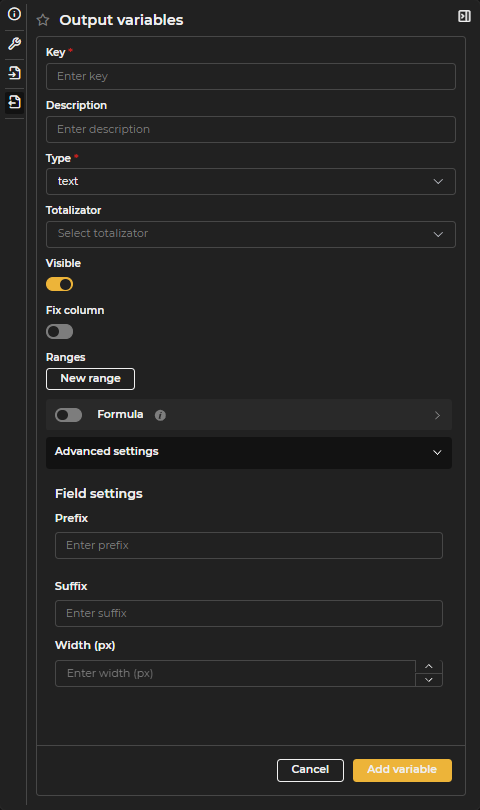
Figure 3.6: Output Variables Configuration Form
Key: Name of the column as it appears in SQL.
Description: Name of the variable that will be visible to end users. If a description is not defined, the Key will be used as the description.
Type
- Integer: Returns only integer numbers.
- Decimal: Returns decimal numbers.
- Text: Returns text strings.
- Date: Returns dates. Allows defining the display format (e.g., dd/MM/yyyy, dd/MM/yyyy HH:mm).
- URL: Returns links or URLs.
- Latitude-Longitude: Returns a geographic point in LATITUDE,LONGITUDE format (e.g., 40.714123,-74.006231).
Aggregator: Allows showing a total at the end of the table for the selected column.
- Count: Shows the total number of results.
- Distinct: Shows the number of distinct results.
- Sum: Shows the sum of the values.
- Average: Shows the average of the values.
- Minimum: Shows the minimum value.
- Maximum: Shows the maximum value.
Visible: Determines if the output variable will be visible to the user. It may be helpful to hide variables used as links or identifiers but not shown in the table.
Fix column: Allows fixing the column on the selected side of the table so that it remains visible even when there are many columns.
Ranges: Allows highlighting values with colors according to defined ranges. Multiple ranges can be configured for the same variable.
- Color: Color applied to the range.
- Text color: Color of the text if the selected type is Background.
- Type: Text applies color to the text; Background applies color to the cell's background.
- Mode: Cell applies the color only to the cell; Row applies color to the entire row.
- Conditions: Allows defining conditions to apply the color. For example, if the value equals OK, it applies green; if it is between 50 and 100, it applies red.
Formula: Allows creating calculated variables based on other output variables. Variables are indicated in brackets and can use simple operations, for example:
[NAME] ' ' [SURNAME][TIME_SECONDS] / 60
Advanced configuration
- Prefix: Adds text as a prefix to the column values.
- Suffix: Adds text as a suffix to the column values.
- Width: Defines the width in pixels of the output column.
Once the variable is configured, select Add variable or Confirm variable to apply the changes.
It is only necessary to declare the columns that will be used in other LUCA elements or to which a format will be applied.
Internal Variables
In addition to the input variables configured in each query, LUCA exposes three internal variables that are always available:
:LUCA_CURRENT_USER: identifies the authenticated user.:LUCA_CURRENT_DATE: returns the execution date and time.:LUCA_ENV: indicates the active environment.
They can be referenced directly in SQL or in Velocity code without needing to declare them in advance or assign default values.
Query Editor
In the central area, there is the query editor where the SQL code to be executed can be written.
Below the editor is the preview section, accessible by clicking on the Preview text. This section allows testing the execution of the query, displaying the configured input variables to enter test values and evaluate the various behaviors of the query.
In addition to SQL, Velocity code can be added to queries. The main use of Velocity in LUCA is to allow input variables to be optional, although it can also be used in other cases.
To use an input variable in SQL, it must be added in the format :KEY. The following example assumes there is an input variable whose key is USERNAME.
select * from luca_execution_register
where username = :USERNAME
To make the USERNAME variable optional, Velocity must be used. The directive #if($USERNAME) ... #end checks if a value has been entered in the input variable. If a value exists, all the code included between #if ... #end will be added to the query.
select * from luca_execution_register
where 1=1
#if($USERNAME)
  and username = :USERNAME
#end
Variables in SQL must be used in the format :KEY, while in Velocity code, the format $KEY is used.
If the input variable USERNAME has been marked as multi-selection, in \#USERNAME# should be used instead of = :USERNAME.
select * from luca_execution_register
where 1=1
#if($USERNAME)
  and username in #USERNAME#
#end
The directive \#USERNAME# is replaced during execution with (SELECT 'username1' USERNAME UNION ALL SELECT 'username2' UNION ALL ...), allowing it to be used as follows.
select *
from luca_execution_register ER
inner join #USERNAME# U ON ER.username = U.USERNAME
The previous examples demonstrate the use of a single input variable, but you can include as much Velocity code as necessary.
select * from luca_execution_register
where 1=1
#if($VARIABLE1)
  and column1 = :VARIABLE1
#end

#if($VARIABLE2)
  and column2 = :VARIABLE2
#end
The clause #if ... #elseif ... #end can also be used.
select * from luca_execution_register
where 1=1
#if($VARIABLE1)
  and column1 = :VARIABLE1
#elseif($VARIABLE2)
  and column2 = :VARIABLE2
#end
For input variables of type temporal range whose class is DATE_RANGE, you can access their values by prefixing the $ symbol to the key, followed by a dot and the desired value. The available values are:
dateFrom: start date of the range.dateTo: end date of the range.prevDateFrom: start date of the previous period to the current range.prevDateTo: end date of the previous period to the current range.
Below is an example of usage:
select
  case
    when execution_date >= $DATE_RANGE.dateFrom then 'current'
    else 'previous'
  end period,
  *
from executions
where execution_date
between $DATE_RANGE.prevDateFrom and $DATE_RANGE.dateTo
It is important to note that the value of the variable is returned as a string, so it must be used in quotes and converted to a date. The conversion is performed differently depending on the type of database. The date format is dd/MM/yyyy HH:mm:ss. Below are conversion examples for different databases:
Table 3.1: Syntax conversion of text to date
| Database | Syntax |
|---|---|
| MariaDB/MySQL | STR_TO_DATE('$DATE_RANGE.dateFrom', '%d/%m/%Y %H:%i:%s') |
| PostgreSQL | TO_DATE('$DATE_RANGE.dateFrom', 'DD/MM/YYYY HH:MI:SS') |
| SQLServer | CONVERT(varchar,'$DATE_RANGE.dateFrom',131) |
| Oracle | TO_DATE('$DATE_RANGE.dateFrom', 'DD/MM/YYYY HH24:MI:SS') |
| Neo4j | datetime('$DATE_RANGE.dateFrom') [small]#Required format: 'yyyy-MM-ddTHH:mm:ss'# |
The syntax in Trino is very similar to that of the database being used, though with minor variations. If in doubt, consult the Trino manual available link:here.
Boolean-type variables can be used like any other variable in Velocity, allowing filtering of columns not defined as boolean. Below is an example with a boolean variable with the key IS_FINISHED:
select *
from tickets
where date_end #if($IS_FINISHED) is not null
               #else is null #end
Query Execution
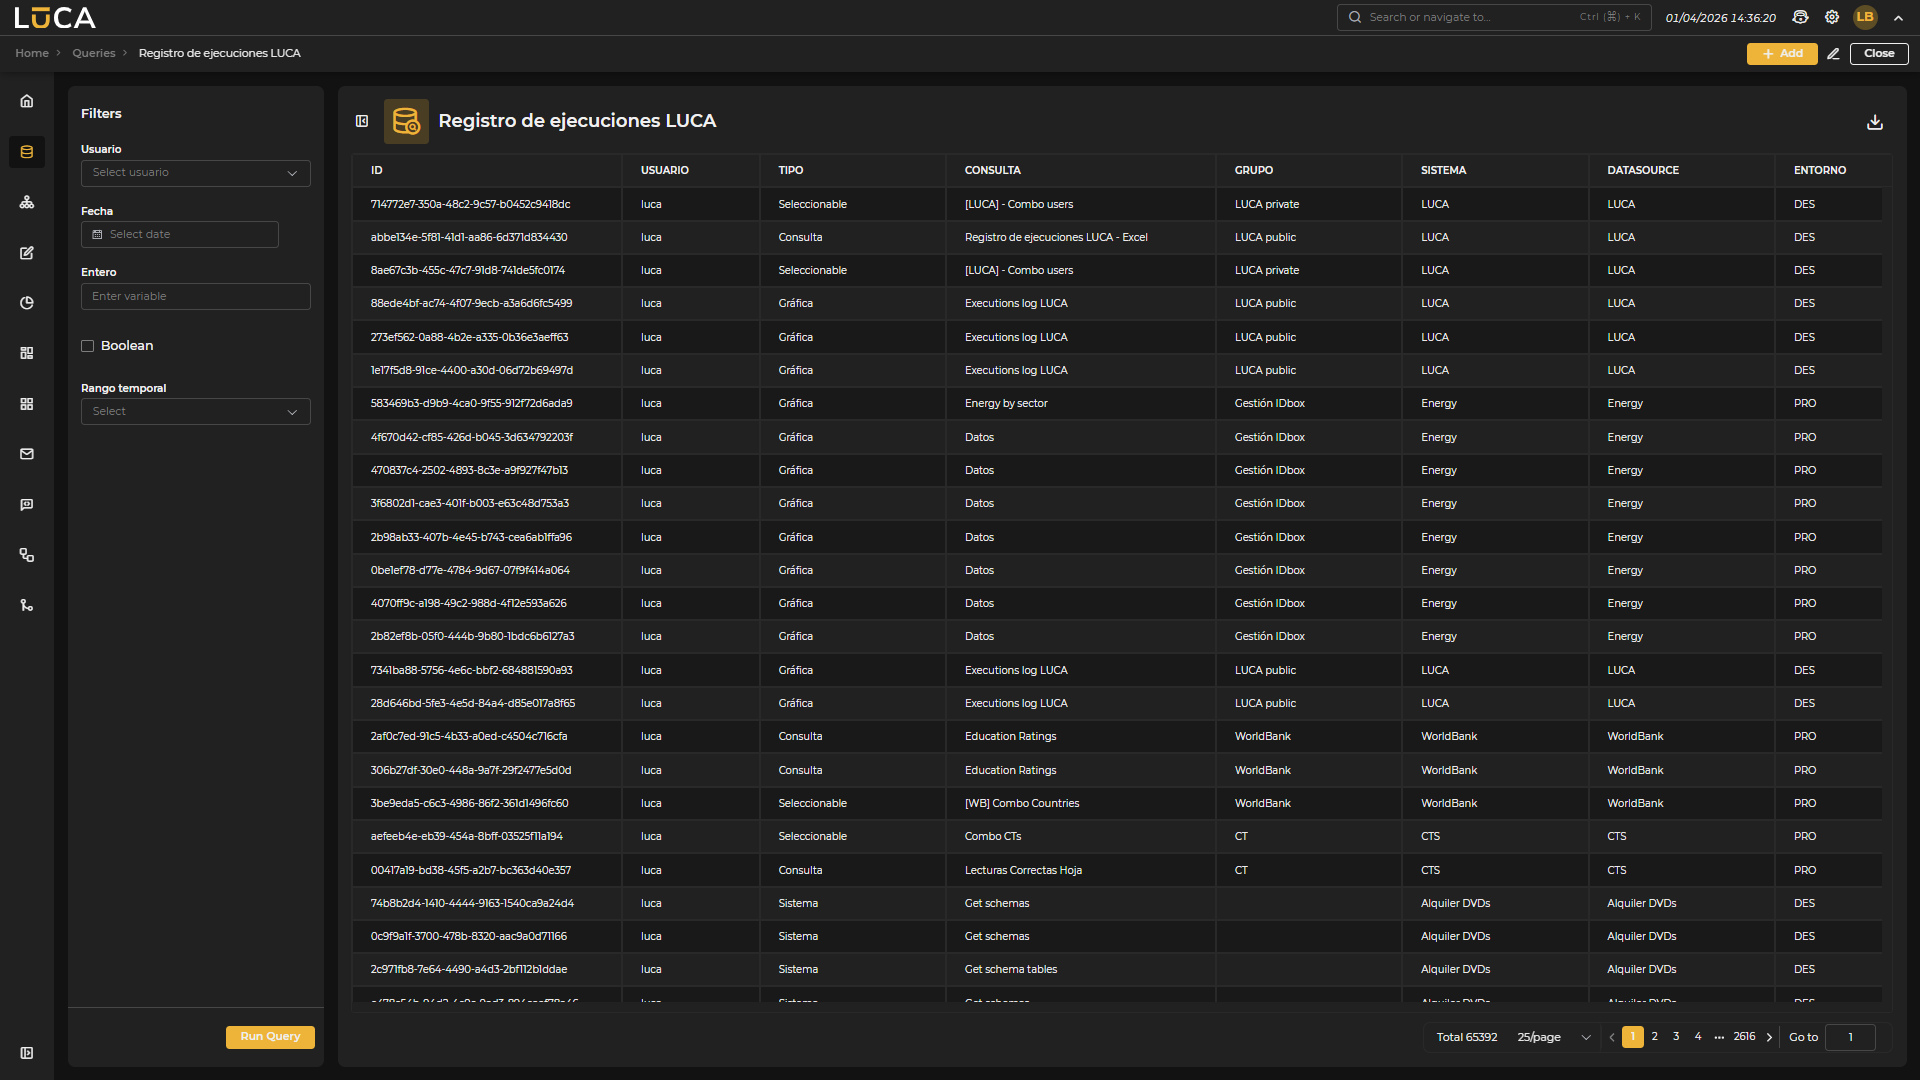 Figure 3.7: Query Execution
The execution view allows visualizing the results of the query. On the left side, the input variables are displayed to filter the data and the environment selector where the query will be executed. To initiate execution, click the Run Query button.
In the upper right, the Add, Edit, Export, and Close buttons are available. The Export button allows generating a CSV or Excel file with the results of the query.
Combo Queries
Combo, static combo, and remote combo queries are designed to provide values to combo-type input variables.
These queries require the declaration of two mandatory output variables:
- DETAIL: Text that will be displayed to the user in the dropdown.
- VALUE: Internal value used for filtering. It may differ from the displayed detail. For example, in a type selector, the VALUE variable might be a numeric identifier while DETAIL contains the textual description.
These variables are automatically created when selecting a combo-type query.
Combo
In addition to the mandatory output variables, combo-type queries support one additional input variable. This variable can have any key and is used to link one combo variable to another.
If multiple input variables are declared, only the first will be used for linking; the rest will be ignored.
Remote Combo
This type of query requires an input variable with the key SEARCH. This variable is used in SQL to filter results according to the text entered by the user in the dropdown. Example:
SELECT USERNAME AS DETAIL, USERNAME AS VALUE
FROM USERS
WHERE 1=1
  #if($SEARCH)
    AND USERNAME LIKE '%:SEARCH%'
  #end
In addition to the SEARCH variable, an additional input variable can be declared to create a linked remote combo, as described in the previous section.
Static Combo
Unlike the previous types, static combos define fixed values that are not obtained by executing a query. This type is appropriate when the set of options is small and stable over time.
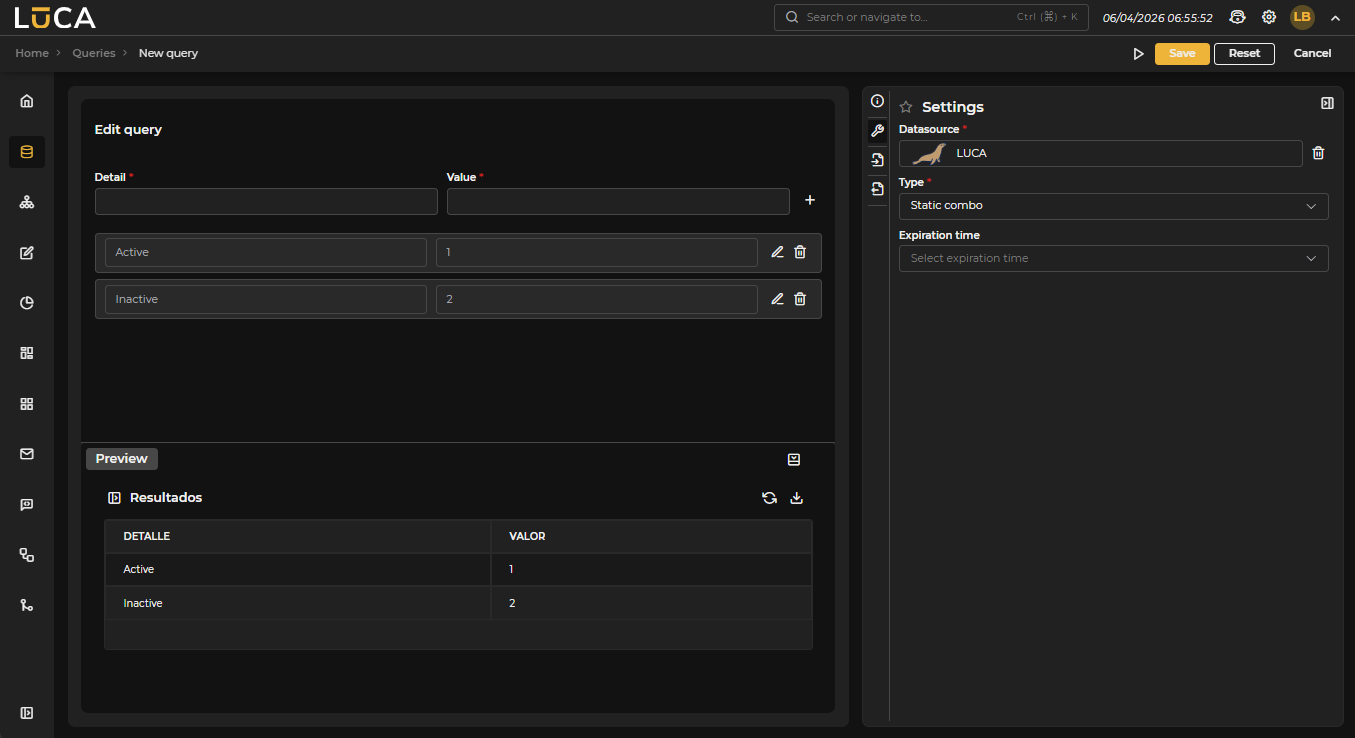 Figure 3.8: Static Combo Query
HTTP Queries
LUCA also allows queries to REST or SOAP web API services.
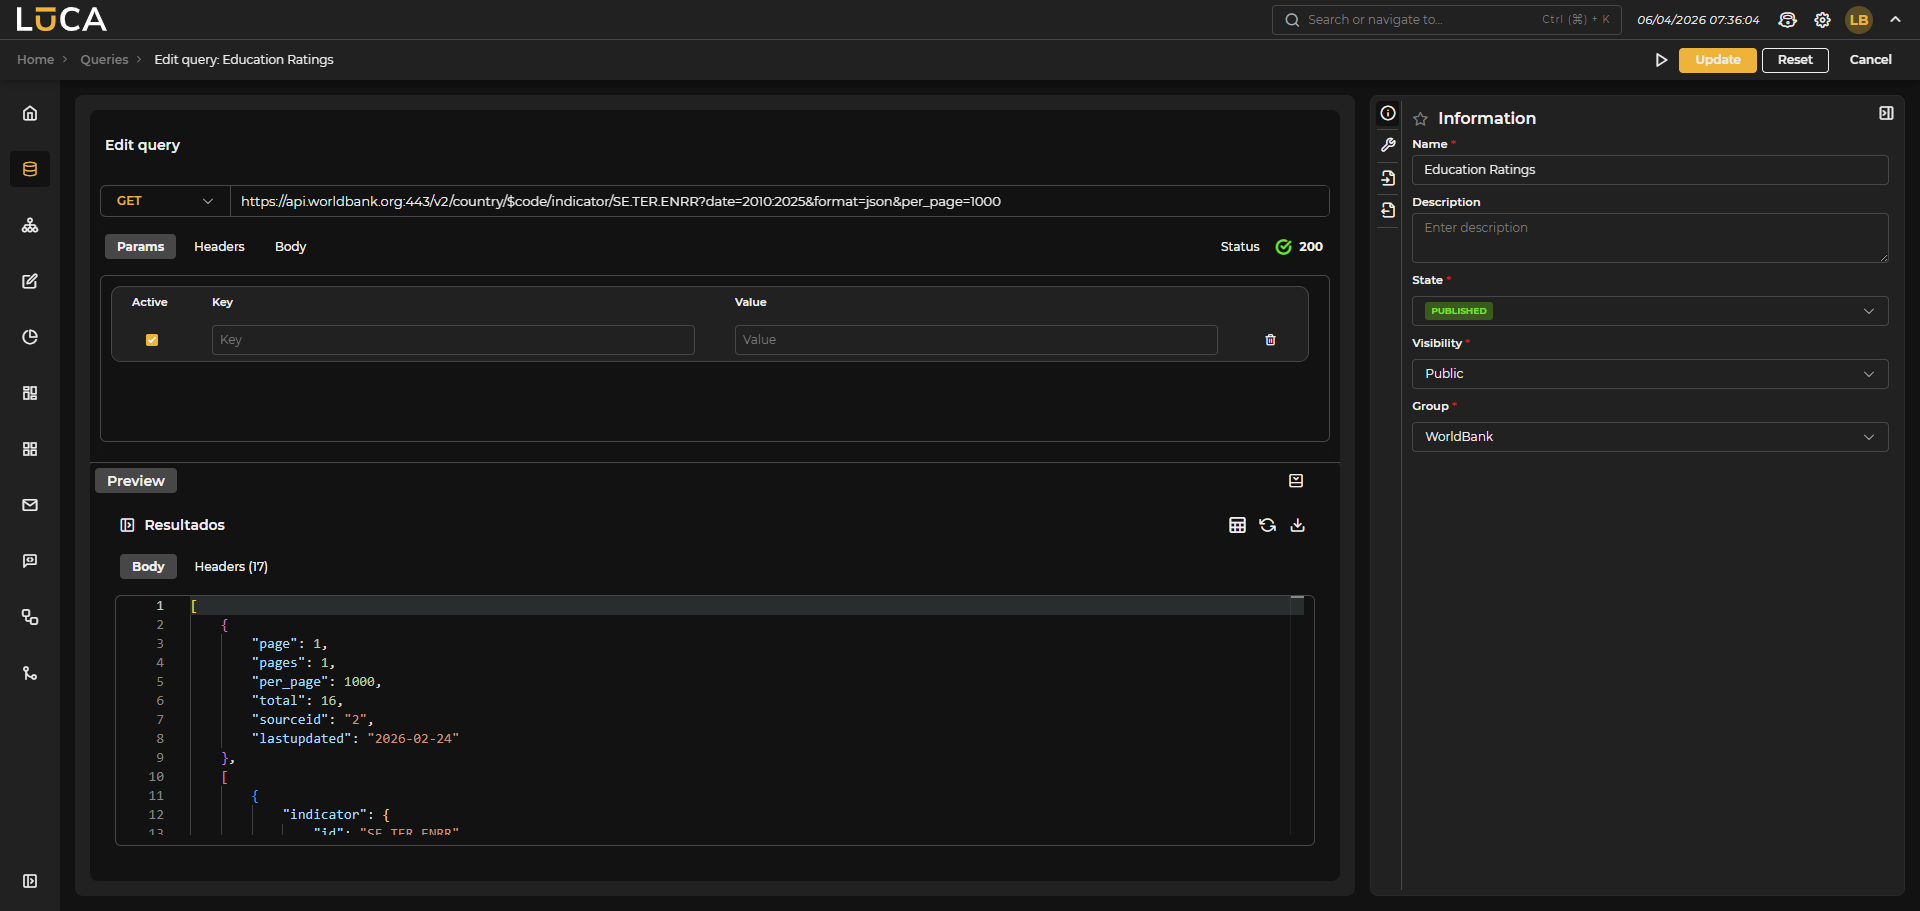 Figure 3.9: HTTP Query
Configuration
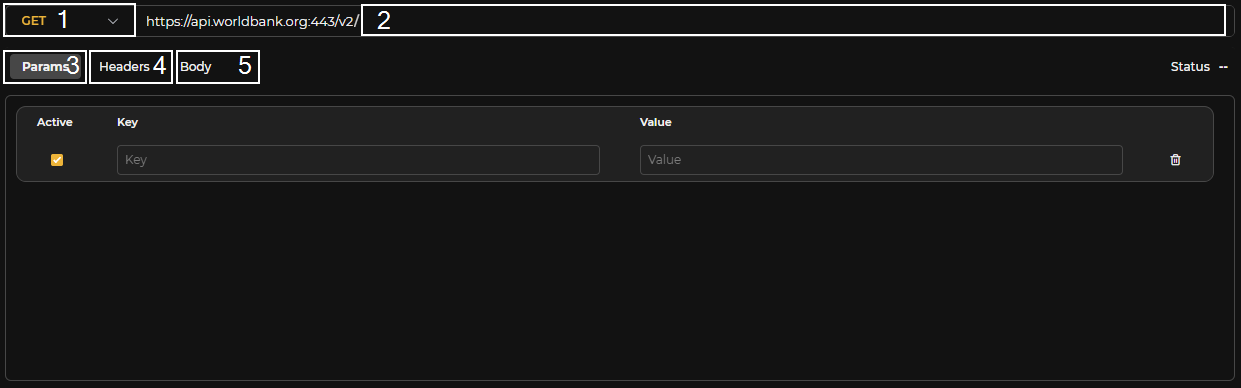 Figure 3.10: HTTP Configuration
In HTTP queries to datasources, the following fields can be configured:
-
Method: GET, POST, PUT, or DELETE.
-
Path to be added to the request starting from the domain configured in the Datasource. In the path, Velocity variables can be used, for example, to use an input variable like:
https://www.example.com/users/$user
- Parameters that will be concatenated to the URL like:
?param1=value1¶m2=value2
Parameter values are automatically escaped, so it is not necessary to enter the escaped value beforehand.
It is possible to use Velocity code in the parameter values to make use of previously created input variables. For very long values or those requiring Velocity code, there is the option to edit the value in a text editor. At the top of this editor, the previously declared input variables are shown. The upper buttons allow adding the desired variable to the editor by clicking the corresponding button.
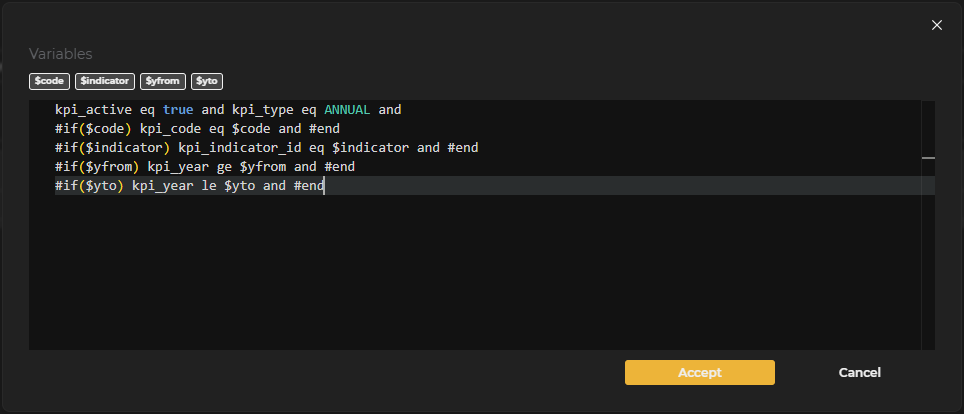 Figure 3.11: HTTP Parameter Editing
An optional parameter can also be defined using Velocity like this:
| Key | Value |
|---|---|
| sortBy | $if($sortBy)$sortBy#end |
If the input variable sortBy is not filled in, the parameter value will be empty and will not be added to the URL.
-
Headers that may be needed for the request. They have the same configuration options as parameters.
-
Body. If the request needs a body, one of type 'x-www-form-urlencoded' or 'application/json' can be configured.
 Figure 3.12: HTTP Body Editing
There are input variables $pageSize and $pageNumber that can be used in any part of the query configuration to implement pagination.
These variables are declared by default and filled with the values from the table paginator. To do this, the query must be marked as paginated.
LOG Queries
LUCA has a connector to log files published via http/s. This connector allows searching by date or navigating through the file in a paginated manner.
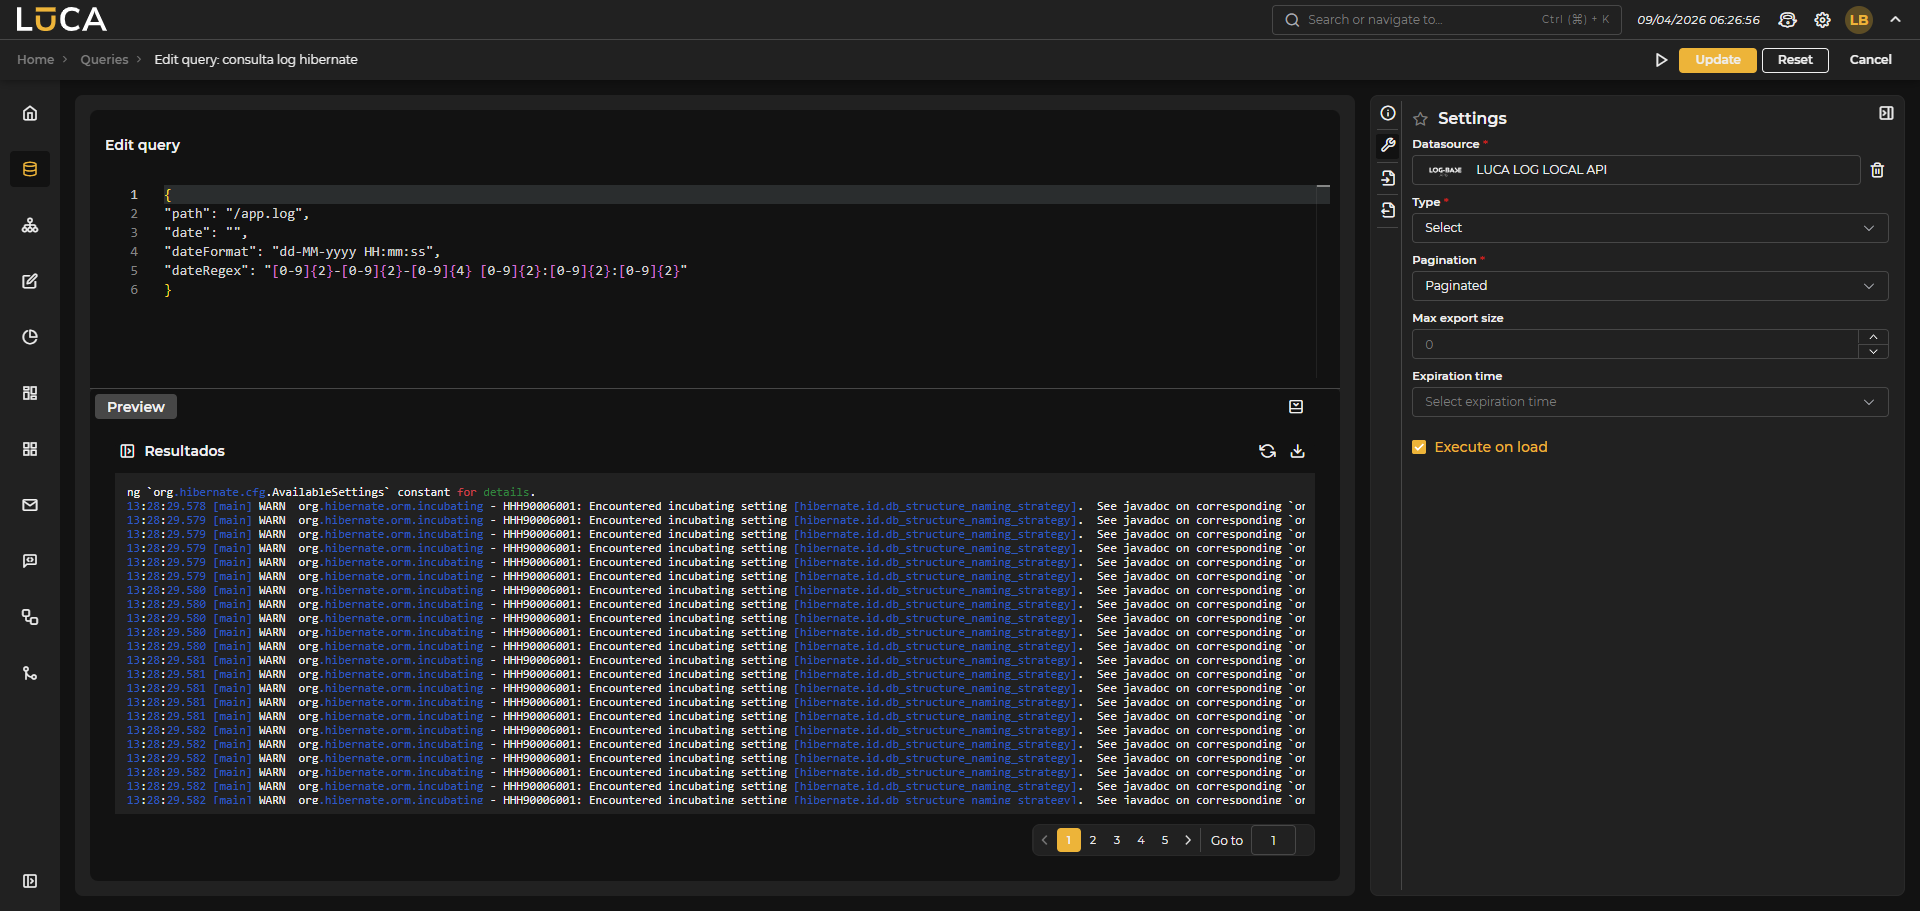 Figure 3.13: LOG Query
Configuration
Unlike database queries where SQL code is written, the LOG connector must define a JSON with a specific format for proper functionality.
{
  "path": string,
  "headers": Map<string, string>,
  "date": string,
  "dateFormat": string,
  "dateRegex": string
}
- path: Path to the log file you wish to access.
- headers: Additional HTTP headers that can be included in the request. Optional.
- date: Date to search in the log. Optional parameter if no date search is required.
- dateFormat: Java link:Java date format that defines how the date to be searched is formatted. Optional if no date search is required.
- dateRegex: Regular expression that defines the pattern of the date to be searched. Optional if no date search is required.
In this example, it is assumed a log published at www.example.com/app.log and a Datasource of type LOG declared with the domain www.example.com.
{
  "path": "/app.log",
  "date": "",
  "dateFormat": "dd-MM-yyyy HH:mm:ss",
  "dateRegex": "[0-9]{2}-[0-9]{2}-[0-9]{4} [0-9]{2}:[0-9]{2}:[0-9]{2}"
}
Within the JSON, it is still possible to use Velocity code to reference input variables or perform calculations.
SQL Console
The SQL console allows executing queries directly on the database without needing to create and configure a query, although this will not be saved. To access it, go to the queries tab and click on the SQL console icon.

Figure 3.14: SQL Console Icon
On the left side, you should select the datasource and the environment on which the query will be executed. Once selected, the database tree will be displayed. By double-clicking any database, table, or column, it is automatically inserted into the editor.
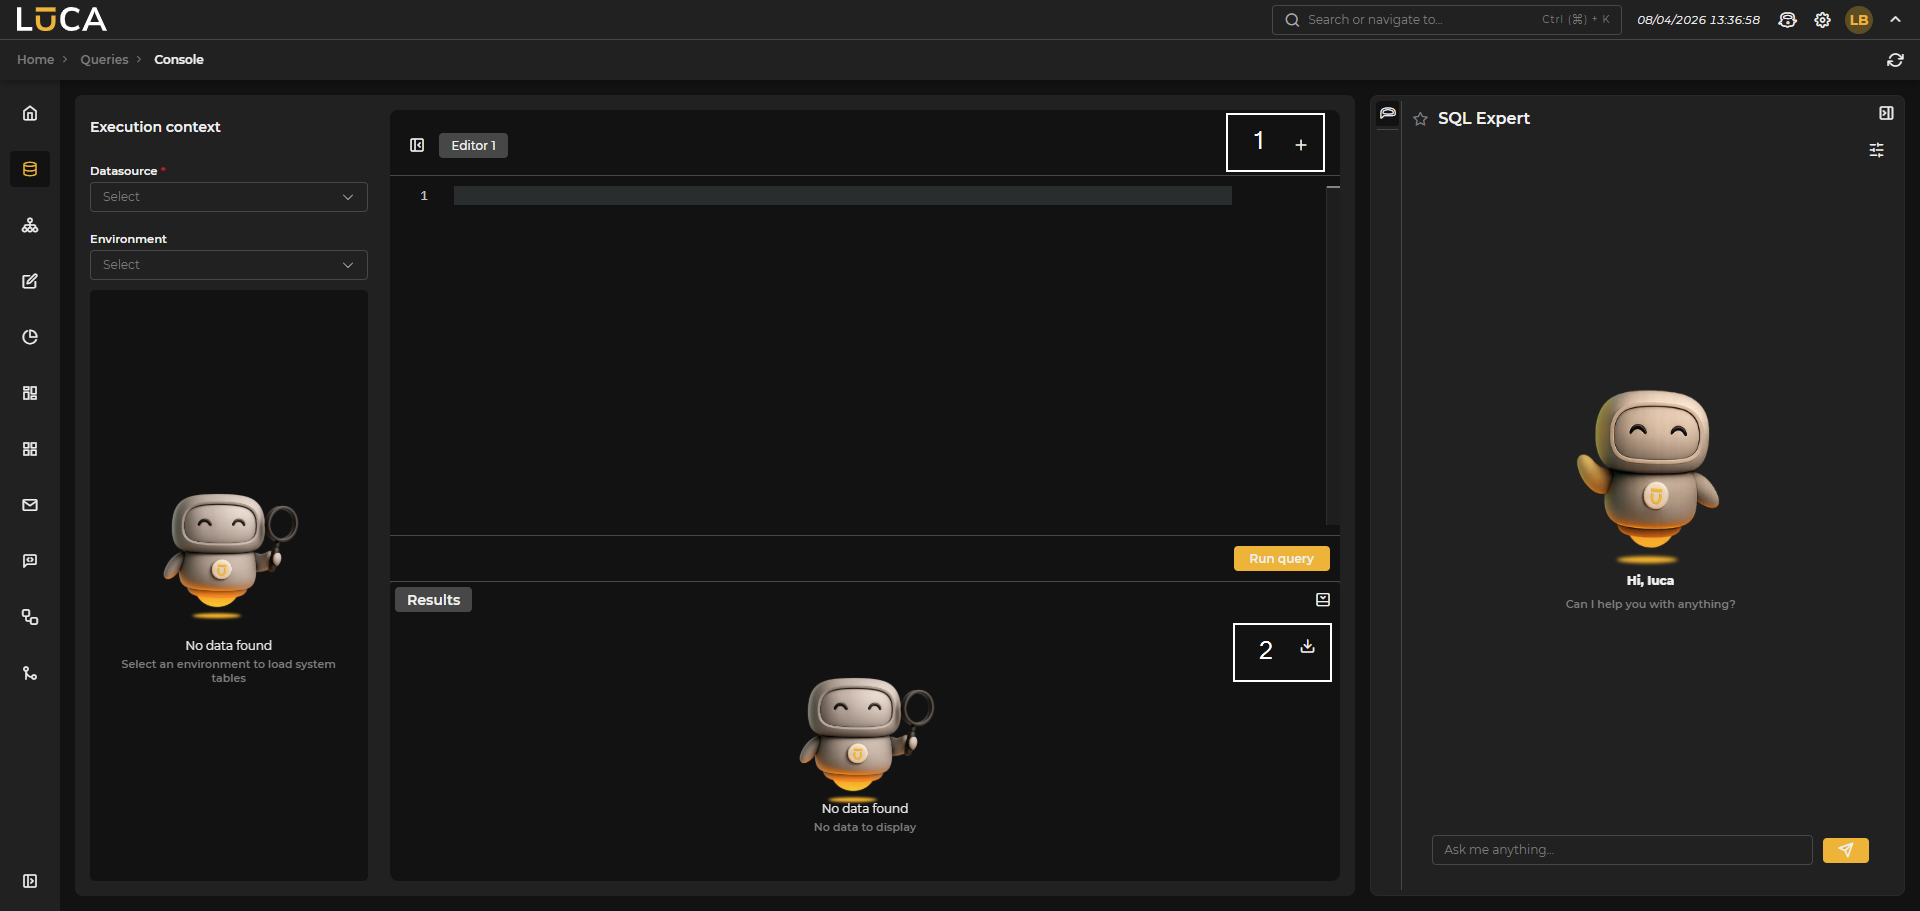 Figure 3.15: Main Page
In the central area, there is the editor where you can write the query. Multiple editors can be created to manage different queries using the button (1) located in the upper right. Below the editor are the Run Query button and the preview of the query execution by expanding Results. Additionally, on the right sidebar, there is a button (2) with options to export the query execution data to CSV or Excel.
On the right side of the screen is the SQL Expert panel, which can be expanded or collapsed. This panel offers an AI chat specialized in SQL that assists users in writing queries. Before starting the conversation, the following can be configured:
AI Model: The AI model that will act as an expert. The model marked as SQL Expert in the configuration of Models will be the default displayed.
Schema: The database schema that the expert will contextualize its responses around. By selecting it, the model will take into account the structure of tables and columns of that schema.
Once configured, you can click Apply to confirm changes or Clear to restart the conversation.
None of the content written in the editors will be saved upon closing or changing windows. This information will only be available while in the SQL console.